


Cheques might seem a bit old-school in this age of digital payments and UPI transactions. However, they still play an important role in banking. For a lot of Indians, cheques are a reliable way of transferring money, especially when it comes to businesses.
Whether you're paying rent, settling a bill, or gifting money to a loved one, understanding cheques is essential. This blog will look into the world of cheque leaves, covering everything you need to know about writing, filling, and even cancelling them.
What is a Cheque Leaf?
A cheque leaf, also commonly called just a cheque, is a single form from a chequebook that serves as a written instruction to your bank to pay a specific amount of money to the person or entity named on the cheque (the payee). It's essentially a secure and convenient way to transfer funds from your bank account.
Here are some key things to know about cheque leaves:
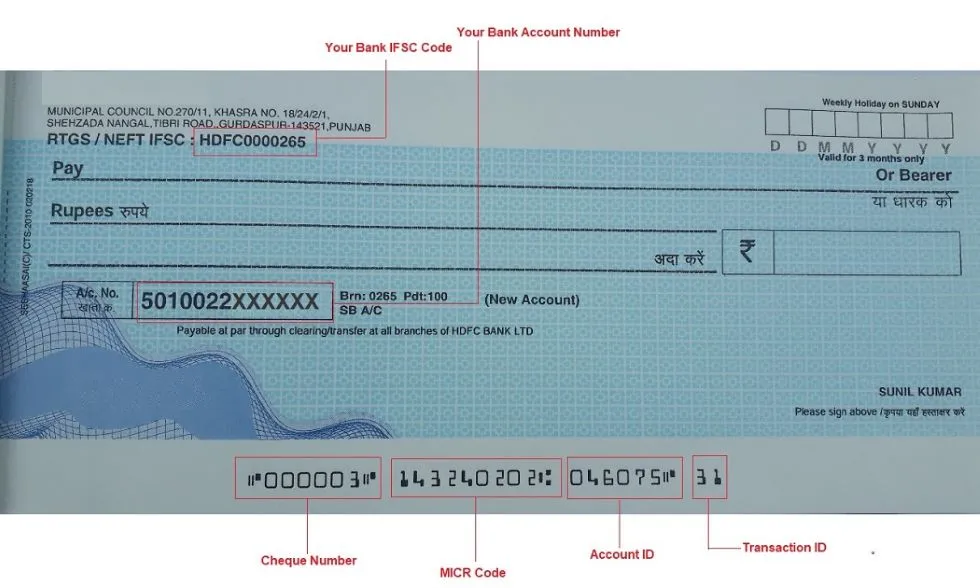
Anatomy of a Cheque Leaf
Every cheque leaf has several key sections:
- Drawer's Name: Your name, printed on the top left corner.
- Date: The date you issue the cheque.
- Payee's Name: The name of the person you're paying the money to.
- Amount: The amount you're paying, written both in numerals and words.
- Bank Name and Branch: Your bank's name and branch details.
- Account Number: Your bank account number.
- Signature: Your signature, authorizing the bank to debit your account.
Functions
- Withdrawal: You can use a cheque to withdraw cash from your bank account at a branch or ATM.
- Deposit: You can write a cheque payable to yourself or your bank to deposit funds into your account.
- Transfer: You can transfer money to another account by writing a cheque with the recipient's information.
Key features
- Cheque details: Include information like the date, amount (written both numerically and in words), payee's name, drawer's signature, cheque number, bank codes (MICR and IFSC).
- Security: Cheques have security features like watermarks, microprinting, and special paper to prevent counterfeiting and alteration.
- Types: Different types of cheques exist, like bearer cheques (cashed by anyone presenting them), order cheques (cashed only by the named payee), and crossed cheques (only deposited into a bank account).
Importance
- Although digital payment methods are gaining popularity, cheques remain relevant in certain situations, especially for larger transactions or in areas with limited digital access.
- They offer a physical record of the transaction and can be a convenient alternative to carrying cash.
How to Write a Cheque?
Writing a cheque is simple, but it's important to be accurate to avoid errors or delays. Here's a step-by-step guide:
1. Gather your materials
- Cheque: Grab a cheque from your chequebook. Ensure it's from the correct bank account and hasn't been previously used.
- Pen: Use a pen with black or blue ink to avoid processing delays.
- Identification: You might need your ID when cashing or depositing the cheque.
2. Date the cheque
- Locate the top right corner of the cheque where the date box is.
- Write the current date in numerical format (e.g., 07/03/2024).
3. Payee information:
- On the line following "Pay to the order of," write the full legal name of the person or entity you're paying.
- Double-check the spelling for accuracy.
4. Amount (numerical)
- Locate the designated box situated on the right-hand side of the cheque.
- Write the amount you're paying in whole numbers. (e.g., ₹123.45).
5. Amount (written)
- On the line below "Pay to the order of," write the complete amount in words, including paisa (e.g., "One hundred twenty-three rupees").
- Start at the far left and draw a line through any blank space to prevent alterations.
6. Optional memo
- If you want to specify the reason for the payment, write a brief memo on the bottom left corner of the cheque.
- This is helpful for tracking purposes but not mandatory.
7. Signature
- Ensure to sign the check on the specified line located at the bottom right corner.
- Use the same signature you have on file with your bank for verification.
8. Additional tips
- Avoid using abbreviations or nicknames for the payee's name.
- Don't make any corrections or write over mistakes. If you make an error, void the cheque and start over with a new one.
- Keep your cheque book and unused cheques in a secure location to prevent theft.
- Consider crossing the cheque for added security. This means drawing two parallel lines across the cheque face and writing "Account Payee Only" between them. This restricts cashing the cheque and requires it to be deposited directly into the payee's account.
Here's a visual breakdown of the cheque-filling process:
Bonus tip:
For extra peace of mind, double-check all the information before handing over the cheque. Ensure the date, payee's name, amount (both numerical and written), and your signature are accurate.
What is a Cancelled Cheque?
A cancelled cheque basically acts as proof that you hold an account in a particular bank. It is used to verify bank account details but not for actual payment. This typically involves:
- Writing "CANCELLED" across the cheque in large letters, often with two parallel lines drawn through it.
- Not filling in the amount or payee information.
- Signing the cheque as usual.
This cancelled cheque serves as proof of account ownership, account number, IFSC code, MICR code, and bank branch details. It's often required for various purposes like opening new accounts, applying for loans, or setting up automatic payments.
How to Write a Cancelled Cheque?
Writing a cancelled cheque is actually quite simple, but it's important to do it correctly to ensure it serves its intended purpose and protects your sensitive information. Here's how to do it:
1. Choose a fresh cheque
- Select an unused cheque from your chequebook. Don't write any information on it besides the cancellation markings.
2. Mark it "cancelled"
There are two ways to do this:
- Cross it out: Draw two diagonal lines across the cheque face, ensuring they don't obscure any crucial information like account number or bank logos.
- Write "CANCELLED" prominently: Write the word "CANCELLED" clearly in bold capital letters between the two diagonal lines (if used) or simply across the cheque face.
3. Optional signature:
- While not universally required, some institutions may request your signature across the cancellation mark for additional verification.
4. Avoid sensitive information
- Leave the payee and amount sections blank. These fields remain unused in a cancelled cheque.
- Don't cover essential details: Make sure your cancellation markings don't obscure vital information like your account number, bank name, branch details, IFSC code, or MICR code.
5. Consider additional notes
- If requested, write the purpose of providing the cancelled cheque on the back (e.g., "For account verification").
- Keep a record of the cheque number and date of cancellation for your own reference.
6. Securely store or dispose
- Store the cancelled cheque in a safe place until it's no longer needed by the requesting party.
- Once it's served its purpose, shred the cancelled cheque for secure disposal to prevent information misuse.
Remember:
- A cancelled cheque doesn't hold any financial value and cannot be used for payment.
- Follow the specific requirements of the institution requesting the cancelled cheque, as they may have additional instructions.
To Sum Up,
Cheques might seem old-fashioned, but they remain a valuable financial tool for many Indians. Understanding how to write and cancel cheques empowers you to manage your finances effectively. So, the next time you need to issue a cheque, remember the tips in this blog and write with confidence!
Frequently Asked Questions
1. How do I cancel a cheque Leaf?
Draw two lines, write "CANCELLED" between them, and don't fill any other details.
2. How do you fill out a cheque Leaf?
Fill in payee, amount, date, and sign - follow instructions on your specific cheque.
3. When does one require a cancelled cheque?
A cancelled cheque is required for verification for various services like account opening, loan applications, etc.
4. What are the risks associated with cancelled cheques?
While seemingly harmless, cancelled cheques hold sensitive details like bank info. Handle them with care to avoid potential misuse.
5. Can I cancel the cheque using red ink?
No, use black or blue ink to ensure clear cancellation.